

Unknown to most, there is a world of artisan chocolates. People who make chocolate by themselves, in a regular kitchen, with utensils everyone can buy. I don't mean making chocolate as in melting down some baking chocolate and pouring it into molds. I mean taking a cacao plant and turning it into a chocolate bar. "Artisan" means they're doing it for the art of the process, not with the goal of making the most money, but with the goal off seeing what kinds of flavors develop from certain types of bean, and really letting that singular flavor come through.
Some of these makers, like Mast Brothers, Patric, and Madre, have small factories or shops, usually just one building in one location. Some, like Potomac, are so small, the chocolate maker is literally working in his basement on machines he built himself. Others, like Taza and Chocovivo, stone grind their chocolates, or only grind them once, leaving them with a texture unlike any others. Chocovivo doesn't even temper theirs!
What is tempering? What does a cacao bean look like? How does it become a chocolate bar if all you have to add is sugar to make it? The more I tasted these amazing chocolates, the more questions I had. I searched online, read wikipedia entries, watched youtube videos, but it's not the same as seeing it done in a kitchen, being a part of that process from beginning to end. So when I found this two day class, I signed up!

It's held at a place in Orange County, CA, called Qzina. They supply restaurants, bakeries, and caterers all over southern CA. They also have a bunch of classes in pastry and confection making.
As much as I was interested in learning how chocolate is made, I also was really hoping to come away with enough knowledge to perhaps make a hot chocolate directly from the cacao bean! How awesome would that be?!
So, in that spirit, let me show you what it was like to make chocolate from a bin of cacao beans!

This is the inside of the Qzina showroom and demonstration lobby. We browsed the products they sell, admired the amazing chocolate sculptures created by the chefs, and ate lunch here.

Chef Francois Mellet was our instructor. He is very French, and absolutely amazing at what he does.
Which is work with chocolate.
Every day.
I can't even fathom...

In Qzina's huge storeroom, he explained to us the entire process. See the plastic bin his hand is resting on? That's 30 pounds of cacao beans. This room was amazing. They store many bins of beans from various places around the world, and the smell of them filled the entire place. Not a chocolate smell, but a tangy, fruity, earthy smell.

There are three types of cacao beans that are mainly cultivated - criollo, forastero, and a hybrid of the two, trinitario. The beans we were using for our class were trinitario beans. This sack was from the Gran Couva Estate on the Caribbean island of Trinidad.

The beans were cut from their pods and fermented on the farm in Trinidad. Once they've fermented the desired amount of time (usually about two or three days), they are dried and packed into sacks for shipping all over the world.

First thing we did was sift them. Sometimes bits of the plant, leaves, insects, and other things can get bunched in there as they pack the beans. Sifting them gets rid of all that stuff and just leaves you with whole beans.

Which is what is in that bin right there. Sifted, ready-to-roast cacao beans.

Here's a portion of the storage containers of cacao beans they had there. It was fascinating reading the labels, seeing where each bean had come from. Such an insane variety!

The beans were scooped into the roaster. It rotates while the beans roast to make sure they all heat evenly.

We roasted them at around 185 degrees for over an hour. Occasionally, we would pull a couple out to check them and see how the flavor was developing. It was amazing to taste how the flavor changed as they roasted!

They slowly began taking on fruity tones and a bitterness that you could somehow sense chocolate in. It's hard to explain, because it didn't taste like chocolate yet. But the scents and tones of what our final chocolate would be were developed here, and I don't think I recognized that entirely until we were done and could taste those same flavors in our finished chocolate.

When they had roasted long enough, they had to be cooled quickly, so they'd stop cooking inside the bean. This pan connected to the front of the roaster was a metal screen that had air being pumped up through the beans. We took turns raking and churning them so they could all get cooling air over them.

Here they are, roasted cacao beans. They continue to call them cacao until the grinding process begins, when they finally switch to calling it cocoa.

The next step was to remove the thin crispy shell around each bean. This shell is the dried pulp of the cacao plant, which the beans are immersed in while inside the cacao pod. The acid that forms and penetrates the bean as that pulp ferments is the first step of creating an individual bean's flavor. But now that we've roasted them, the flavor is there, and it's time to remove that husk.

Apparently some pioneer of chocolate making learned that if you cracked the bean, the husk came off very easily. Not only did it come off, but it's very light compared to the bean chunks, so it can be separated out simply by vacuuming them away as the cracked beans fall into another bin. This is called cracking and winnowing, and this is the machine that does it.

And this is what you now have - cacao nibs. The cracked, shelled, roasted cacao beans. I don't know why they call them nibs. I bought a bag of these months ago online. These are a delicious, albeit bitter, snack, and they are really, really good for you! Chocolate doesn't become bad for you until the sugar is added.

You should order some! They are really good in yogurt, ice cream, almost anything. There's even some salad dressing recipes out there that use them, and some meat and poultry rubs!

It's still not chocolate yet, though. Those nibs need to be ground up a few times. This is the grinder. It has a filter on it that has little holes in it, and once the nibs are ground small enough, it comes through the holes and falls into the pan underneath.
It's becoming liquid because of the fat content in the bean. The friction of grinding the beans heats them up, which melts the fat inside of each bean. That fat is cocoa butter. So as the solids get ground smaller, and the fat gets liquefied, you end up with cocoa mass (also called cocoa liquor).

Here's the grinding discs. Yep, I tasted that.

Once that first grinding is done, we change the filter to one with smaller holes. So now the cocoa mass won't drip out until it's ground even smaller.

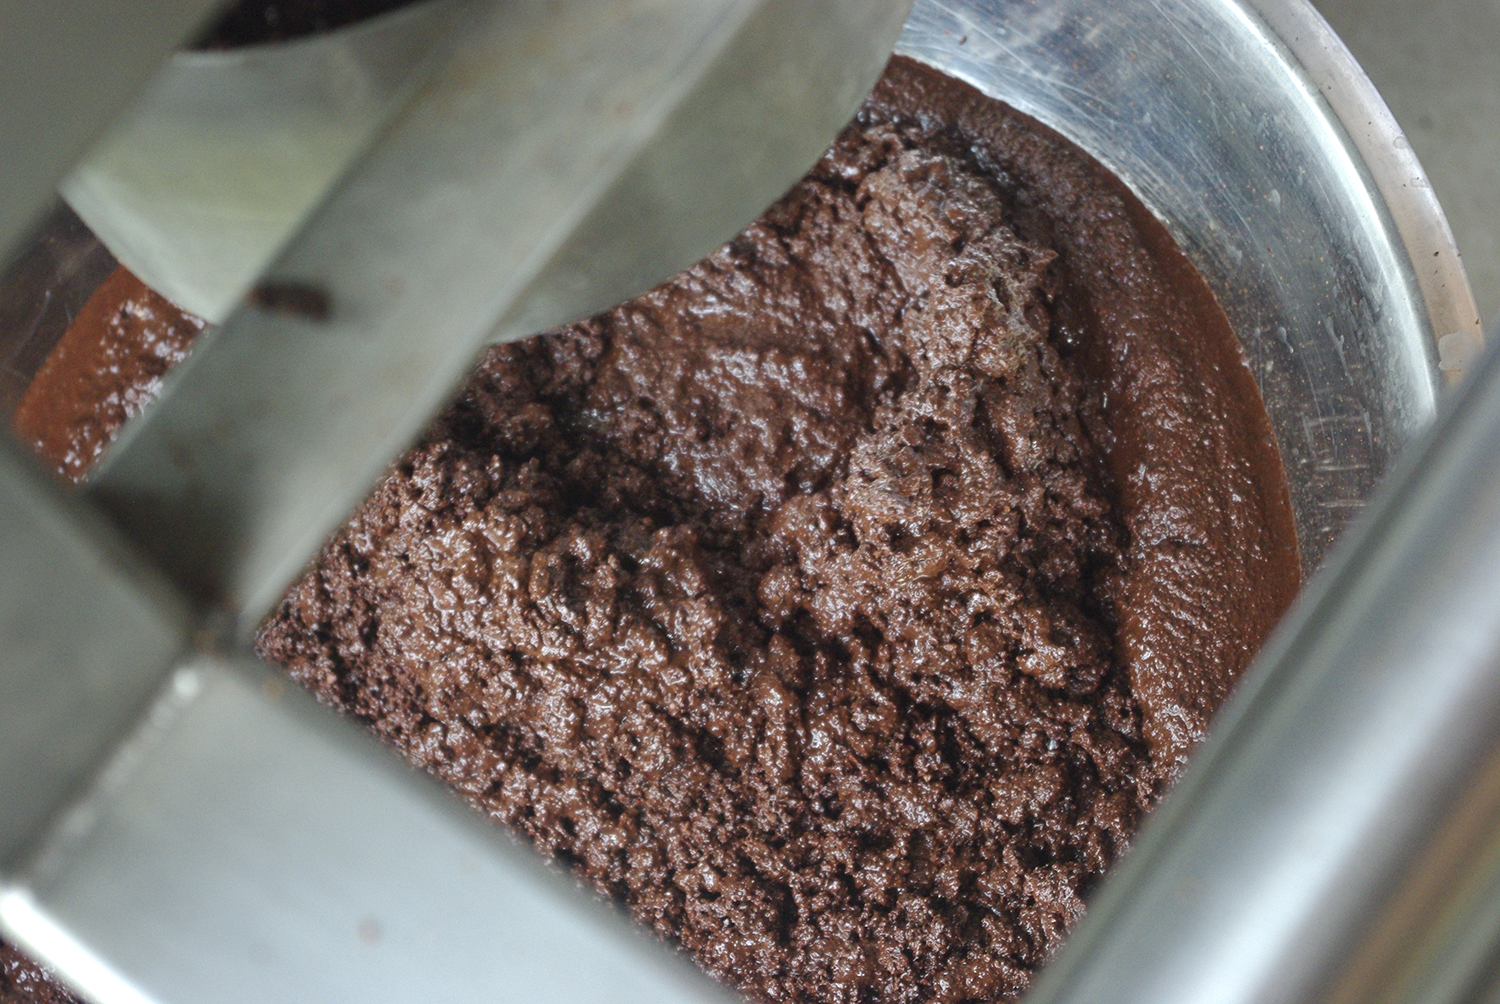
Finally, it's starting to look like chocolate! This is still nothing but the bean. Amazing! We tasted it after every grinding stage, to see if the flavor changed. Once the grinding began, the flavor changed very much, with all that warmed up cocoa butter. It actually got worse! Even though this looks delicious, it's pretty horrible!

Once the three stages of grinding was completed, we weighed it to see how much of the original 30 pounds we lost during the process. It was just a tad under 20 pounds now! Crazy!

The last stage of the day was the refining machine. This metal bucket was filled with steel balls, each about 1/4 of an inch around. Paddles inside the bucket rotated everything, and once we turned this on, it ran straight through the night and even after we all arrived the next morning. This really smoothed out the chocolate into a liquid, not grainy at all.
This was also the stage where we added the other ingredients to create our finished chocolate!

Once we got the cocoa mass into the refiner, Chef Francois showed us how to create a chocolate recipe. We decided to make a 72% dark chocolate. That means 72% of the entire final product had to be derived from the cacao bean.

67% of our recipe was the cacao mass we made, then we added in an extra 5% of cocoa butter. The extra cocoa butter would make it a bit smoother and shinier for a better presentation and melting smoothness.
This is the cocoa butter. Of course, we all had to taste this, as well. It tasted almost like nothing. Like plain wax.
We added 0.6% of lecithin powder. Lecithin is an emulsifier, so I believe it might help keep the cocoa solids and butter from separating once the chocolate is solidified.

You know when you have a chocolate bar for a really long time and it gets that white powdery coating on it? That's the cocoa butter separating out from the solids and slowly oozing to the surface. If you ever see that on your chocolate, do NOT throw it away! It's fine, it's still good, it tastes exactly the same. Would you throw away a salad dressing if the oil and water separated? No, you wouldn't. So don't throw away your chocolate!
To bring our recipe up to 100%, we added in 27.4% sugar. And that's it! Cacao bean, sugar, and a touch of lecithin. We put the other ingredients into the refiner with the cocoa mass, and it ground them up and smoothed them out right along with the chocolate.
For the remainder of the first day, we tried tempering chocolate by hand on the large marble table they had there, and we made some bon bons with some chocolate they had made the day before. I'll explain more about tempering in the Day Two post.
I'll get Day Two posted ASAP! Maybe I'll squeeze in a hot chocolate before that, though.
Man this is fascinating! Keep it up Sean, I love reading this stuff.
ReplyDelete